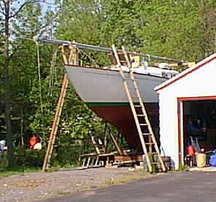
 Because of an accident in the boat yard in 1997, the wiring harness going to the bottom of the mast was sheared at deck level. Since the wiring on deck is not long enough to reach into the bottom of the mast, I'll need to replace the wiring that goes to the bottom of the mast step.
If you look in the hanging locker in the head, you should find a bundle of wire heading under the side deck and up under the cabin top. You may even be lucky and find a set of screw terminals attached to the bulkhead. These terminals act as a junction for the wiring built into the deck and the wiring built into the hull.
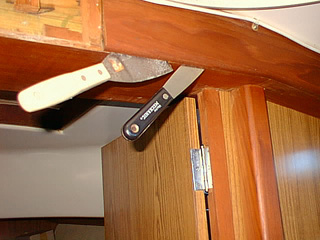
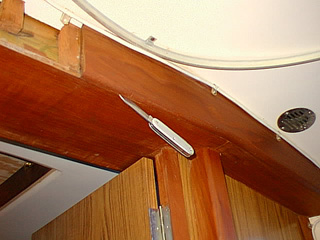
The next step is to try to actually get at the wire. This will be difficult. I started by removing the decorative trim from around the beam which supports the mast step. Starting with a small pocket knife, I forced it between the two boards that are simply nailed together. Once a small gap was opened up, I started using a putty knife and later a scraper to carefully pry the board from its place. A small pry bar was used to pry the nails from their places when the scraper proved to be inadequate.
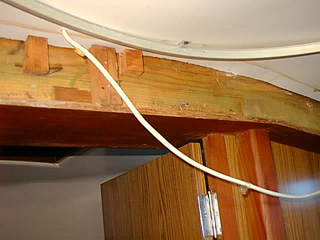 Once the face boards are off, you can see the oak support beam for the mast step. The small blocks of wood are fairing blocks used to align the joiner work in the cabin. The white cable hanging in the photo is the coaxial lead for the masthead VHF radio antenna. My biggest surprise in removing these boards was the absence of the wiring for the mast lights.
 Further investigation (and lots of tugging and pulling) revealed that the wiring for the mast travels up from the hanging locker and between the coach roof and hull liner along the port side of the forward bulkhead of the head.
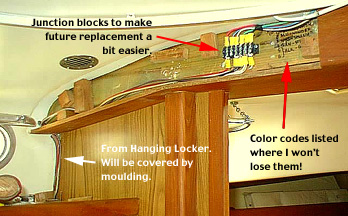
Although it was impossible for me to run the new wiring in exactly the same path, some creative rearrangement of the fairing blocks for the beam cover and some limited drilling into the hull liner resulted in an acceptible arrangement. After the wiring was completed and tested, the joinery was replaced.
 The next problem in rewiring the mast was to replace the wiring that resides there. I removed the cast fittings at the top and bottom of the mast and within 24 hours had two pairs of starlings nesting in the mast. Over the next 72 hours, the nests were rebuilt and removed on a daily basis, even though I covered the ends of the mast with plastic bags to discourage the birds. By the time I attempted to pull the new wiring harness through the mast, it had become plugged solid with feathers, straw, and bits of scrap paper.
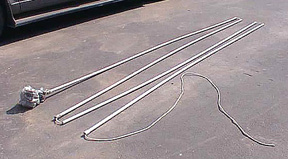 Introducing the mast plunger! It is composed of four 10-foot sections of PVC electrical conduit. These are fit together forming a nice 40-foot battering ram that, in theory, will push debris from one end of the mast out through the other. The working end of the ram is made of plastic grocery bags stuffed into one another to form a soft ball that will fill the interior of the mast cross section. A quarter-inch line is run through the length of pipe so that it can be pulled as well as pushed through the mast. HINT: Before you try this at home, remove all of the winches and cleats from your mast. If your Alberg is like mine, you will find that these fixtures were mounted with screws that protrude well into the mast cavity.
Although the plunger seemed like a neat idea, it had its limitations. I did manage to push the debris in the mast down to within 6 feet of the end, but could push it no further. I eventually fabricated a "corkscrew" out of a coat hanger and attached it to the end of a broom handle to pick apart the blockage and pull it out of the end. I was truely amazed at how much stuff hand been "stuffed" into the mast to keep the wires from rattling and clanging around. In addition to several cubic feet of straw supplied by my avian friends, there was enough foam rubber to upholster a small chair, plus the usual collection of electrical tape scraps and several cutouts from the mast when the openings for the halyard sheave were cut. (I guess that tells you when the mast was last opened up and cleaned out!)
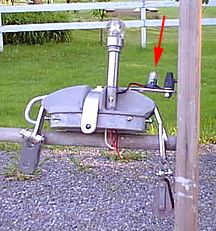 A new wiring harness was built and snaked through the mast. I had hoped to install plastic conduit and internal halyards, but logistical problems (the new halyard sheaves were backordered with no clear delivery date) and my desire to get the boat into the water in a matter of days instead of weeks caused me to change my mind. To the left is my masthead fitting with a new light for the Windex fly. By replacing two of the wires in the mast with heavier gauge wire, I was able to consolidate the electrical grounds for all of the various lights and add a separate circuit for the Windex light without adding a new connector at the mast base.