Submitted: December 1997
Hello everyone!
I've finally completed chronologically-organizing my photos of the different projects I've worked on aboard my A35, Sojourn. I'd like to share some of the projects with all of you, so I thought I'd begin with my 'water tank removal process', followed by my 'Yanmar Installation'.
Before going on, I'd like to emphasize the point that I learn as I go -- I'm definitely not a boat wright (or whatever a professional boat builder is called!). I've learned a lot about working on boats from the work I did on my last boat, an Alberg 28' Triton. It seems like I'm always learning something new...with every project! Luckily, I've got good common sense and the stuff I don't know how to do -- I try to read about - talk to others that might have good opinions (or think they do), look at how they may have handled a particular project - and of course the old trial and error method... which often ends up taking a lot of time and money. And, if I'm not sure about how strong to build/fabricate something - then I usually tend to over build it!
As you know, there are often multiple ways to go about doing a particular project. What follows is the process I went through in extracting the two water tanks from the cabin sole which enables complete access to the bilge area... Hopefully this may help generate ideas for you!
WATER TANKS - Removal Process
Stock Alberg 35 - There are two water tanks located beneath the main cabin sole. The only access to the tanks is through two floorboard hatches approximately 12" x 18" in size. The tanks are permanently installed under the sole; each tank sits individually on a fiberglass saddle in the keel/bilge area, about a foot or so from the bilge bottom. I didn't like the idea of not being able to have full access to the water tanks for inspection, cleaning, etc. and to the surrounding hull area.
 After spending a little time looking the situation over and discussing it with my Uncle (who has a lot more experience working on boats than I do), we decided to make the tanks more accessible. My Uncle, Nick, volunteered to do the cutting, so I let him! He's got a steadier hand than I do anyways! The first thing we did was measure the width of the tanks. We determined where the sides of the tank were in relation to the floor, moved outboard an inch or two and drilled a small pilot hole in the groove between two floorboards in the sole.
The pilot hole was just large enough to fit the thin jigsaw blade. It was then a matter of keeping a steady hand and cutting down the length of the sole. [If you don't have a steady hand, I'd recommend rigging up a straightedge for the jigsaw.] The photo here is shot from aft, facing forward port - Nick's body is in the head area making the cut towards the stern. The forward access panel can be seen towards the middle lower right of photo. 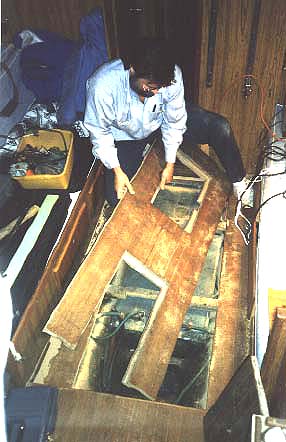 Here you can see the cut out sole being removed. The cut was made all the way back to the end of the aft floor board hatch. This is where the sole is elevated an inch or so, just in front of the engine compartment - near the bottom of the photo. [This raised area will later be eliminated/lowered to the same level as the rest of the sole - I'm 6' 2" so I want all the head room I can get - also, the elevated sole is something annoying to trip on.] And of course, the two rectangular shapes on the sole are where the access hatches go. The sole is supported by several beams glassed to the hull.
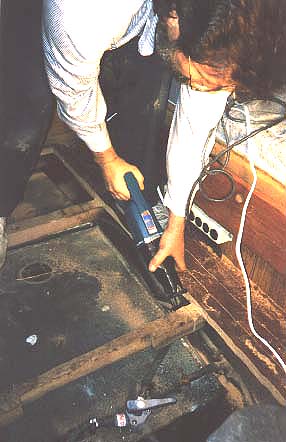 In order to remove the tanks, the aft beam had to be cut. From where you see the cut being made to the hull is about eight inches - enough to drill a couple holes in to sister another beam along side the original cut beam and through bolt them together to provide support the sole when it is replaced.
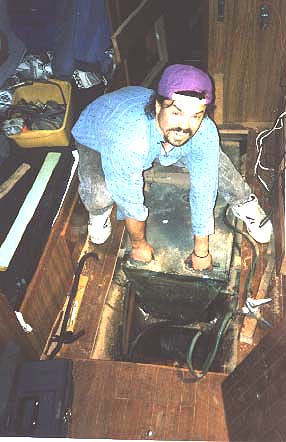 You can see here that, even with the beam cut out, the remaining structure is strong enough to support the sides of the remaining sole with me standing on it - no problem. The aft tank is removed first and then the forward tank (which is partially under the head shower area) is pulled back and also removed.
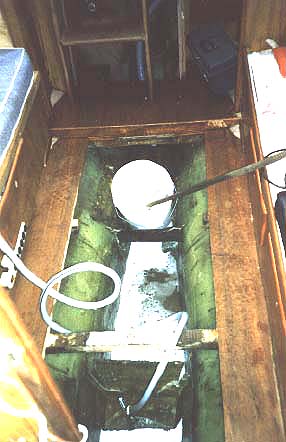
![]() Here's a shot looking forward, with the water tanks extracted. On the bottom of the photo you can see a glassed in shelf (that a green brush is resting on) which was later chiseled out. If I remember correctly, this shelf is where the water pump sat. And of course, the old plumbing hoses were removed and thrown away.
Here's a shot looking forward, with the water tanks extracted. On the bottom of the photo you can see a glassed in shelf (that a green brush is resting on) which was later chiseled out. If I remember correctly, this shelf is where the water pump sat. And of course, the old plumbing hoses were removed and thrown away.
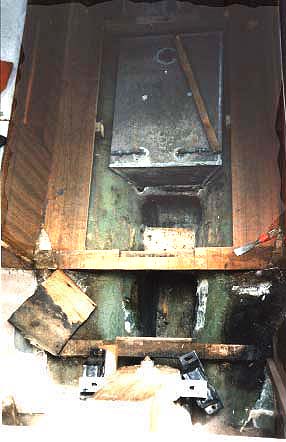
 This photo was taken facing aft. Once the tanks where removed, I went ahead and cleaned/scrubbed the whole bilge area. At the top of photo, you can see the elevated sole I spoke of earlier. I ended up removing it. This allowed full access to the engine compartment -- the Yanmar and its stringers that I installed protrude out a little more than the Atomic 4's. When this area is done being worked on, the raised sole will not be put back the way it was - I will make it the same level as the rest of the sole. The original wood will be recycled so as to match to style and color.
 Here's an overhead shot taken from the companionway looking straight down. The photo quality is not very good, but at least you can get an idea of the 'overall look' under the main cabin sole. The tanks are in their original spots/saddles. Straight down - bottom of photo (hard to make out) is a mockup of my Yanmar (I was just begining the engine fitting/installation process). Just in front of the engine area, you can see that the elevated sole portion has been removed. The beam just in front of the engine model was incorporated into the stringers.
For those of you that are interested, watch this web site for my Yanmar installation adventures!
As I look back at what I've done here, I'm glad I went ahead and went through this process of extracting the water tanks. I now have complete access to the bilge area and water tanks. If the boat wasn't over thirty years old, I probably wouldn't have done it.....or maybe I would have - I don't like the idea of not having access to the bilge/hull area! The jigsaw cuts through the sole are hardly noticeable because the cuts where made in line with the grooves already there. The cross cuts are a little noticeable....but who cares!
Once the tanks were removed, I cleaned them out and replaced them back the way they were originally....for now! I still need to completely redo all the plumbing and secure the sole with possibly a hinge up top towards the head bulkhead and add some lock down devices. At this point, I've gone ahead and am working on other projects, I'll probably be getting back to the plumbing later this winter. I'll submit another photo or two later, to show you that the cuts through the sole are hardly detectable.
I'll write again soon. Take care,
Walter,
SOJOURN