Last updated: 2005 June 18
This page contains various techniques for mounting batteries in an Alberg 35. Locating batteries is often an exercise in compromise. If you are contemplating changes to your house batteries, perhaps you can get some ideas from the following photographs and comments. Have you done something different? Please share!
House Batteries on JuJu, Hull #13
My Batteries were below the cockpit floor just forward of the bulkhead when I purchased JuJu. Not a very good location for maintenance.
I moved my batteries to the port side locker just forward of the lazarette opening. This is were the original manual bilge pump was located and so I relocated it in addition to updating.
What I did was to build a plywood box for the batteries and then epoxy it. A bracket from the bulkhead to the lazarette shelf was constructed to set the box upon as well.ÊThe location gives me access to the three batteries to maintain them, but I do have to remove the inside one to get the others out.... I have two hullside batteries with the long side parallel to the bulkhead and the third (starting battery) with the short end parallel to the bulkhead.ÊThis arrangement lets them fit into the existing space. I also cut down a 2X4 to use as a spacer between the batteries to hold them in place in addition to the straps and it works well.
Greg Cahanin
JuJu
House Batteries on Touche, Hull #42
My batteries were also mounted on the shelf integral with the fresh water tank under the sole in the main saloon. My new batteries are installed in the same location. I believe I have something around 225 amp hours capacity shoved under there now.
The original batteries were 12v Marine Deep Cycle batteries connected to the 1-2-Both switch. Each was about 85 amp hours, so the total was about 170 amp hours. As the batteries aged, they began to dislike each other, and would self discharge in the Both position. The vendor is also a boater and is sensitive to the concept of being "off grid." With his tutilage, I chose to change to two 6v industrial traction batteries in series. This provides me with about 225 amp hours capacity, and no concern about batteries eating each other. Additionally, the industrial batteries can be discharged to 20% of max capacity, while the 170 amp hour marine batteries could only be discharged to 50% of capacity. This means that the old system had a usable capacity of 85 amp hours, while the new system has a capacity of about 180 amp hours.
I would recommend this modification only to those who are determined, as i was forced to saw-off the tops of the battery terminals, and carve the underside of the sole hatch with my router. All was accomplished easily in a single evening, and has been quite satisfying.
At the same time, since i was replacing both the #1 and #2 batteries with a single large capacity pair equaling 12v, I also added a Group 24 gelled electrolyte battery under the cockpit sole aft of the driveshaft as the new #2 battery. The charging regime for the two battery technologies is quite different, so the Both position is no longer usable. The gell battery is connected to the charger only for short periods of time, and has outlasted the first set of industrial batteries. I consider it the "emergency communications" battery.
All primary battery wiring was replaced with 00 gauge wire, and a Heart inverter was added. Now the girls can run the hair dryer after taking a swim. That's important, I guess.
Warm regards,
Bill Smith
Batteries on Solitude, Hull #105
I have my two gell cell batteries in the starboard cockpit locker at the forward end. They are mounted on a platform with box sides and removeable cover for each. They are secured by straps. There is an easy distance from there to the battery switch mounted on the bulkhead beside the engine compartment below the sink in the main cabin. This has worked well for many years now, although they are a bit arduous to remove and return for the season given their weight and the awkward angle in and out of the box through the locker opening.
George Boggs
House Batteries on Tomfoolery, Hull #212
After almost six years with the same set of batteries and nearly constant neglect and mistreatment from the captain, they finally expired and would no longer hold a charge. Time to replace them. Of course, simply buying another set of batteries and just putting them into the boat would be FAR TOO SIMPLE for a REAL boat owner! And thus, another project is born!
When I originally took ownership of my Alberg 35, there were two Group 24 batteries located on a shelf in the bilge just under the aft access panel in the main saloon. This is a good location (low in the boat, amidships as opposed to in the bow or stern), but unfortunately it blocks access to the bilge to get to pumps, hoses, and dropped tools or fasteners. Also, I wanted to increase the capacity of the house bank, and the bilge would not accomodate more batteries, nor could I fit larger ones through the access panel. Well, where could I put a larger battery bank?
After some deliberation and an afternoon with a tape measure, I settled on using the space in the forward set of drawers under the main saloon settees. There were several reasons for this:
- The location was low in the boat and still amidships.
- Each drawer could easily hold two Group 27 batteries.
- It would be relatively simple to run cable from these locations to the mechanical spaces on the boat.
- The modification can easily be reversed and converted back into drawer space.
- The "lost" drawer space can be reclaimed by cutting access hatches through the settees near the forward and aft ends of each settee (where a battery will not fit).
- I already had the new batteries (it was a deal I couldn't refuse), so I knew how much space I needed.
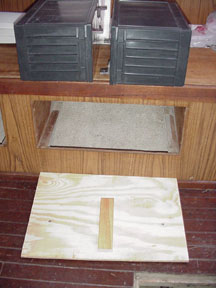
 To place the batteries, I cut a shelf of 1/2 inch plywood that would rest on the drawer slides and support the batteries. A strongback was attached to the underside to add strength and a spacer block was screwed down to the top to maintain space between the batteries. The photo at the left shows the top side of the shelf with the spacer. The two screws mark the ends of the strongback that is attached under the shelf. (Click on the photo to see a larger view.) Above, on the settee, you can see the batteries and how they would sit in their operating position. I later used a hole saw to drill a 1.5 inch hole near the front of the shelf to allow the battery cables to pass as well as providing a finger hole to pull out the shelf with the batteries on it.
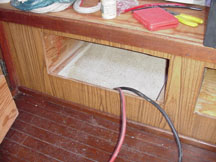
 The next task was to drill through the cabin sole to run the battery cable. I settled on #2 AWG cable. This fits nicely through a 1/2-inch hole, so I drilled two holes at a 45 degree angle (so as to avoid exiting through the bottom of the hull) near the corner formed by the settee base and the sole. Here you can see how the cables come up through the sole. It's a good idea to have a helper when you do this to remind you NOT to attach the crimp lugs to the end of the cables until AFTER you pass them through the holes you have just drilled!
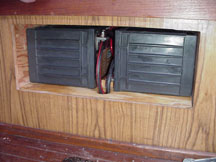
 Here you can see the final result, before attaching the drawer front back to the settee base. Unless the boat is likely to be inverted, there is very little freedom of movement. The addition of a retaining strap would be prudent for sailing in areas where you can expect rough water. This could be easily fashioned, however.
Note that this mounting technique WILL NOT WORK for flooded cells. Sealed batteries, such as gel-cells or AGMs will function just fine. These batteries happen to be 100 A-Hr AGM units that were salvaged from a computer room UPS. The batteries are simply ganged in parallel with each other and then the larger cables are routed back to the battery bank switch at the aft end of the cabin. The boat now has two banks of two batteries each; one port and one starboard to keep the boat balanced. Total battery capacity is now 400 A-Hr; double what it was before. Quick disconnects on the cables would be an added convenience, but not necessary. (After all, these are supposed to be "maintenance free," right?
Installation was completed by removing the drawer front and attaching it back onto the settee with some spring-loaded cabinet hinges to hold the door closed. An aluminum rod was then mounted in front of the batteries to prevent them from sliding out of the shelf at extreme angles of heel.
Tom Alley
Tomfoolery, Hull 212, 1965.


