

For the past couple of years, I have been trying to coax open a 1.5-inch seacock with the hopes of utilizing as a discharge for the head when operating offshore. Unfortunately, the valve was solidly siezed in an almost closed position. The cap on the end of the pipe was also not quite watertight, so I've had a perpetual wet spot next to the head for a couple of years.
Last year I began to attack the valve with penetrating oil ("Liquid Wrench") and, after a couple of weeks, applied as much leverage as I could to the valve's handle. I succeeded only in bending the handle. The bolts holding the valve cock in place were removed and a hammer was applied to the plug to try to remove it. No go. I sailed another season with a leaking thru-hull.
This spring I tried to remove the entire seacock and succeeded only in spinning the entire assembly, breaking what seal was left between it and the hull. Now I HAD to remove the valve before launching.
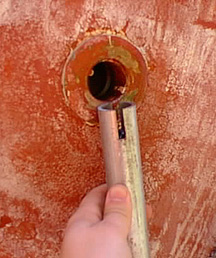 The first step was to find a way to hold the outboard section of the thru-hull still while turning the fitting on the inside. After making some calls to the local boatyards, no such tool was to be found. So I purchased a 10-inch long section of 1-1/4 inch pipe, cut one end off square and then cut a notch in the center of the pipe as shown on the left. Cuts were made on a table saw with an abarasive cutting disk instead of the usual blade. (NOTE: If you do this at home, remember to remove the box from under your table saw that you use to collect the sawdust. Sparks from cutting the steel pipe will ignite it and start a fire.)
The inside of the thru-hull was liberally sprayed with penetrating oil in a last-ditch attempt to help loosen up the threads. A wrench was then placed on the interior fitting and lashed into position such that it could not move very far. (I was without a helper on the day I did this.)
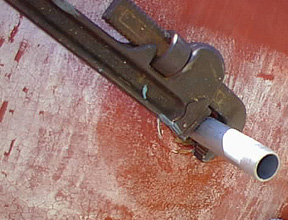 Outside, another large pipe wrench was placed on the "extraction tool" and some elbow grease was applied. After a few seconds of gentle pressure, the bond between the mating pieces broke and the thru-hull was removed.
Once removed, the seacock was given a good bath in penetrating oil from all sides and, with some effort, disassembled. A wire brush was used to clean off corrosion where it was worst and then a grinding compound was used to regrind the valve seat of the stopcock itself.
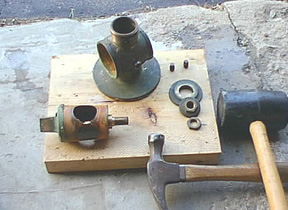 The disassembled valve, prior to regrinding, is shown to the left.
If you have anything to add, please send a note to This email address is being protected from spambots. You need JavaScript enabled to view it.. I'll add your contribution to this page.